A Gentle Introduction to Serverless Development
Intro
For many years, web servers have been used to provide a layer of security for websites. They are often placed in front of database servers and prevent access from unauthorised users. WordPress has a security layer baked in, which explains at least part of its popularity. However, these days running a server for the sole purpose of authentication is not needed any more. OAuth2 protocol abstracts the tasks of authentication and authorization, and identity management can be purchased as a service from all major cloud providers. Google Identity Platform, AWS Cognito and Auth0 are just a few examples.
With a modern tool stack, it is possible to stitch together different services to host HTML pages, store data in a database, authenticate users and more. This technique is called serverless development - as there is no central server that orchestrates the different services. Obviously, many real servers are still involved, but they are not necessarily aware of each other and can be even provided by different vendors. The orchestration can be part of the Javascript application running at the user's browser. The trust, which is crucial for multi-vendor services to work together, is achieved by exchanging signed tokens as part of the OAuth2 protocol.
In this post, I’m going to show how to build a personal shopping list editor. A user can signup to the app on a public URL, create a personal shopping list and store it securely in the cloud. All of that without writing any server code and with no running costs.
We will use Next.js to bundle a React application, and Netlify to serve it to the public. Firebase will store the data securely. We will allow users to sign-in the application using their personal Google account, so we don't need to build a user management system of our own. Live demo and complete source code are also available.
Let’s start.
The Local Application
Our first goal is to create a simple app, a shopping list editor, and run it on our local machine. No database nor authenticating are yet involved.
We will begin with a skeleton application powered by Next.js. This framework allows us to pack React application as a bunch of static HTML, JS and CSS files, so we can easily serve them from a remote server later on.
Run the following command from a new directory:
$ yarn add next react react-domNow add a component to hold our shopping list. Create ./src/components/ShoppingList.jsx file:
import React, { useCallback, useRef, useState } from "react";
let nextId = 0;
function ShoppingList() {  const [list, setList] = useState([]);  const inputElement = useRef(null);
  // adds the value in inputElement to the list  const addItem = useCallback(() => {    if (inputElement.current && inputElement.current.value) {      const newValue = inputElement.current.value;      setList((list) => [...list, newValue]);      inputElement.current.value = "";    }  }, []);
  // removes the i'th item from the list  const deleteItem = (index) => {    setList((list) => list.filter((_, i) => i != index));  };
  return (    <table>      <tbody>        {list.map((item, i) => (          <tr key={nextId++}>            <td>{item}</td>            <td>              <button onClick={() => deleteItem(i)}>Delete</button>            </td>          </tr>        ))}        <tr>          <td>            <input ref={inputElement} type="text" />          </td>          <td>            <button onClick={addItem}>Add</button>          </td>        </tr>      </tbody>    </table>  );}
export default ShoppingList;
This component maintains a local state, an array of strings, that represents the items on our shopping list. The user can add or remove items from the list by clicking the appropriate buttons. For the sake of simplicity, we’re not associating a unique id with each item. Needless to say, style and design are not a factor as well.
Now add ./src/pages/index.jsx. It defines the HomePage component, which renders a header and the ShoppingList component.
import React from "react";import ShoppingList from "../components/ShoppingList";
function HomePage() {  return (    <div>      <h1>Your shopping list</h1>      <ShoppingList />    </div>  );}
export default HomePage;
Now run the project. You can visit http://localhost:3000 to view your craft in action.
$ yarn next devDeploy
Our shopping list application can only run on a local machine. It would be useful to share it with the public, so everyone could benefit from it. These days it’s easy to host applications for free: with services like Github Pages, Vercel or Netlify it is possible to host static assets and serve them with no running costs. The catch is that we need to convert our JSX files to pure ("static") Javascript files, so the client’s browser could process them. Luckily there are a bunch of tools that help with this mission: Gatsby, Next.js and React Static are a few examples.
In our example, we’re going to generate a static version of our app with Next.js, and deploy it to Netlify servers using their free hosting plan.
Run:
$ yarn next build && yarn next exportThis will generate a production-ready and self-contained version of our application under out directory. You can open out/index.html and check!
Now let’s deploy our app to Netlify. The smart people at Netlify have created an npm package to allow deployment directly from the console (or CI environments). Install it now:
$ yarn add netlify-cli --devAfter having Netlify CLI in place, deploy to their servers is simple as running:
$ yarn netlify deploy --dir=out --prodIf you haven’t used Netlify in the past, don’t worry. Just follow the prompt messages and it will create an account on your behalf. You can accept all defaults.
In the above command, we asked Netlify to deploy the content of out directory. This is the directory that Next.js has exported the application into. The --prod switch tells Netlify to use the same URL for each deployment, which is based on the site name you chose during account setup. Without this switch Netlify will generate a unique URL for each deployment: this can be useful to share private previews of your website before exposing them on the main URL.
Check out the prompt logs, and look for "Website URL". Netlify has deployed your website to that URL, and it’s now live and any browser can access it! This is how the URL looks on my machine:
Website URL: https://blog-serverless-auth-example.netlify.appYou may have noticed a few changes in the file system. The credentials to sign-in to Netlify are stored in ~/.netlify directory, so they can be picked by other projects in the future. The linkage between your Netlify account and your local project is stored under the ./.netlify directory. ./.next and ./out directories contain the results of build and export steps, respectively, and should be added to ./.gitignore.
Database
Our users want to persist their list somewhere, so next time they open their browser they can continue from where they've left. Traditionally, we would now install MySql or MongoDB on some machine, and build some sort of Restful API to access the data. This also means that we would need to pay the cost of running that machine and perform a lot of maintenance routines. But with the serverless approach, we're going to allow database access directly from the browser, skipping the mediator server. Some of the database-as-a-service vendors are offering a generous free plan, which means you can run your website with literally zero cost.
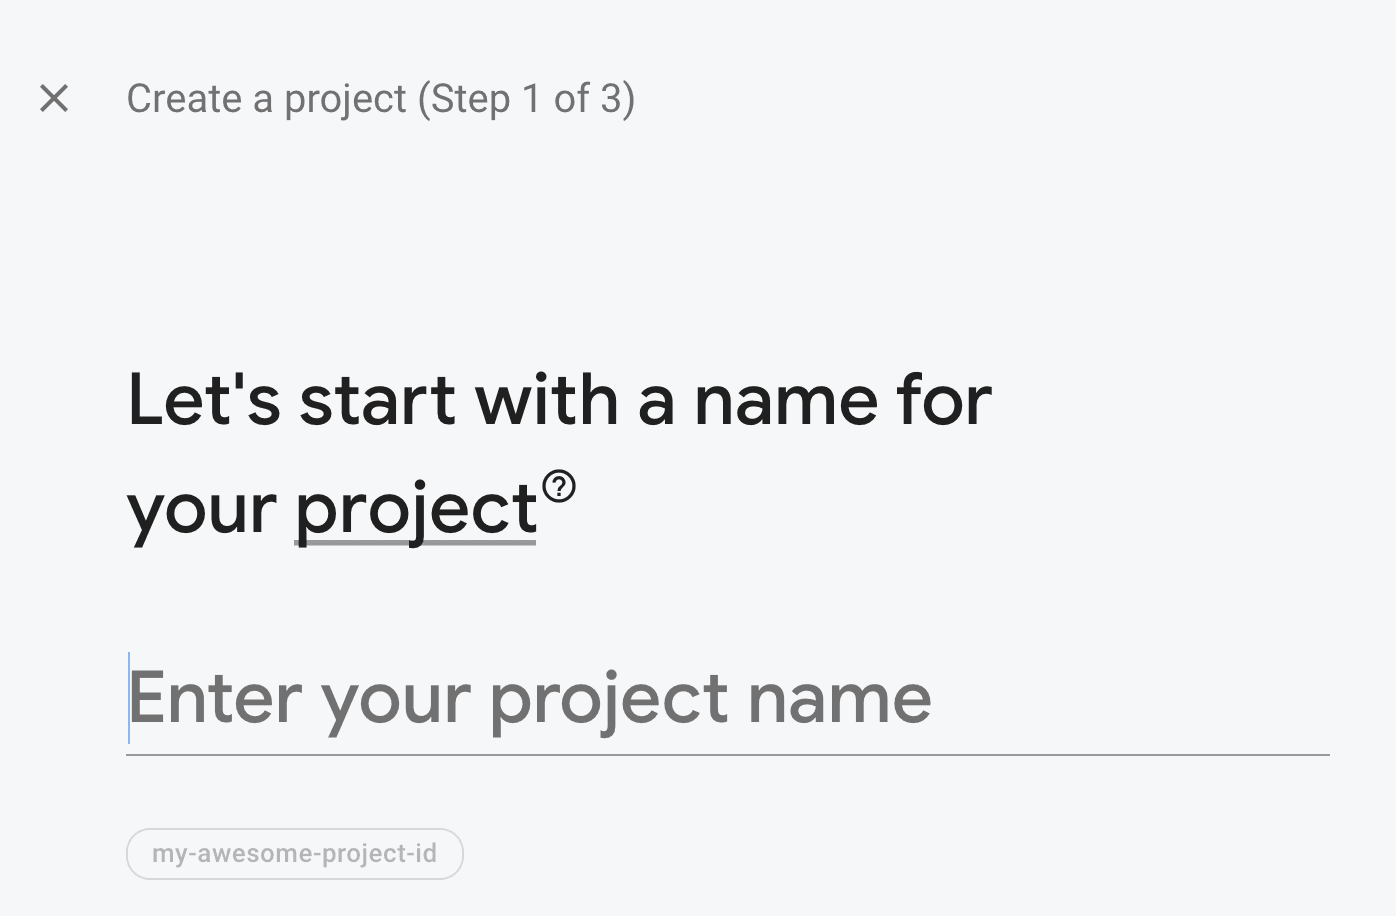
We’ll use Google Firebase as our database service. Go to https://console.firebase.google.com/, sign-in or create an account if necessary, and select "Add project". In the following step choose a name for your project and click "Continue":

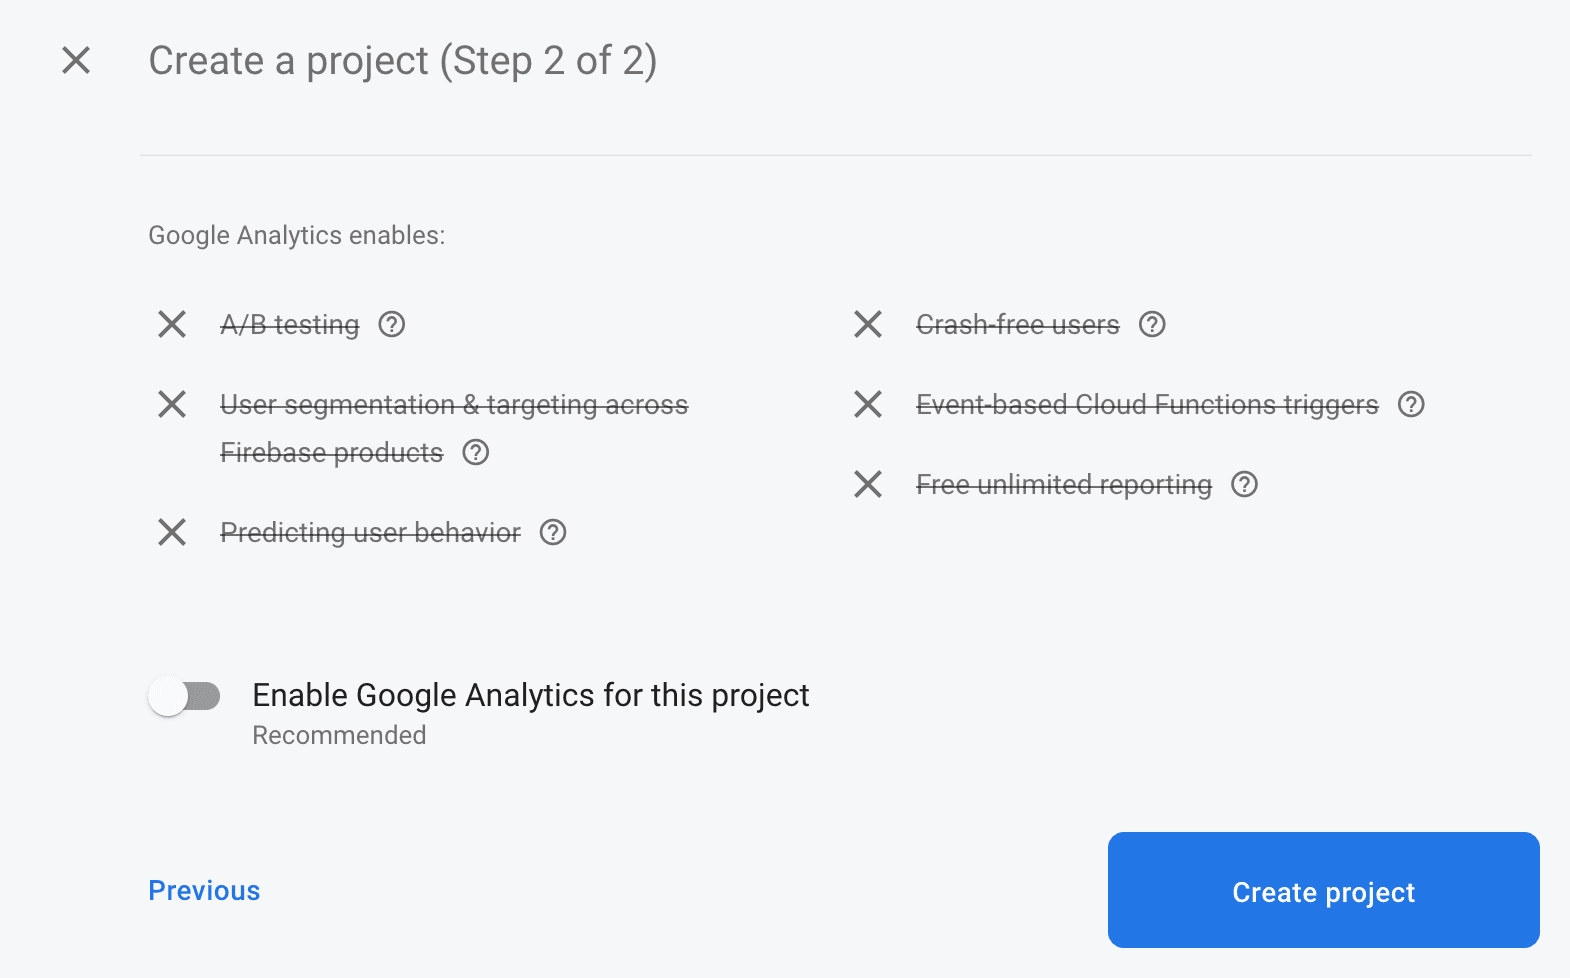
In the next step disable Google Analytics to make things simpler, and click "Create project".

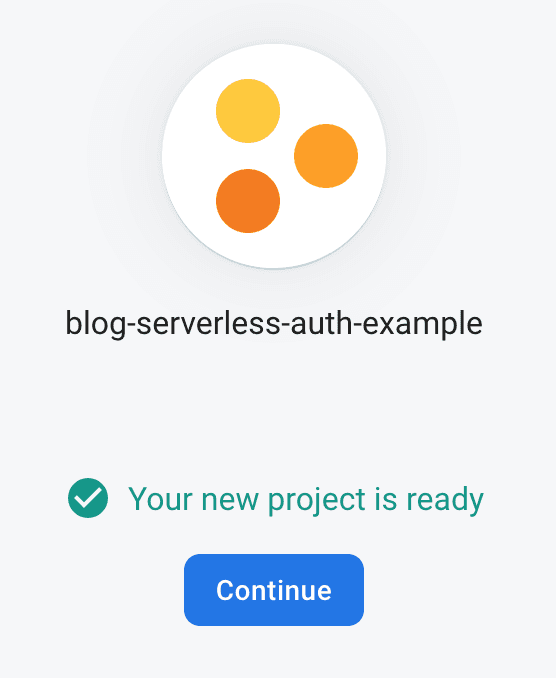
Let Google finish the provisioning work, and click "Continue" when it’s done.

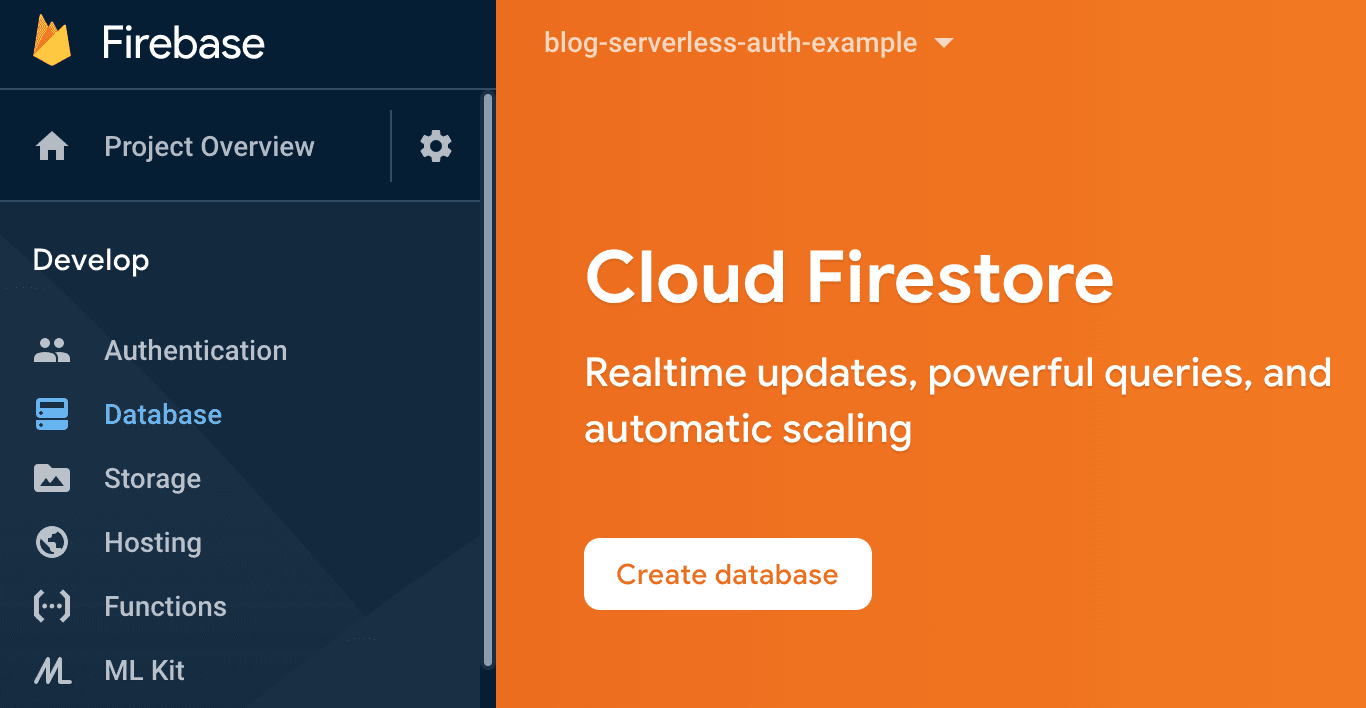
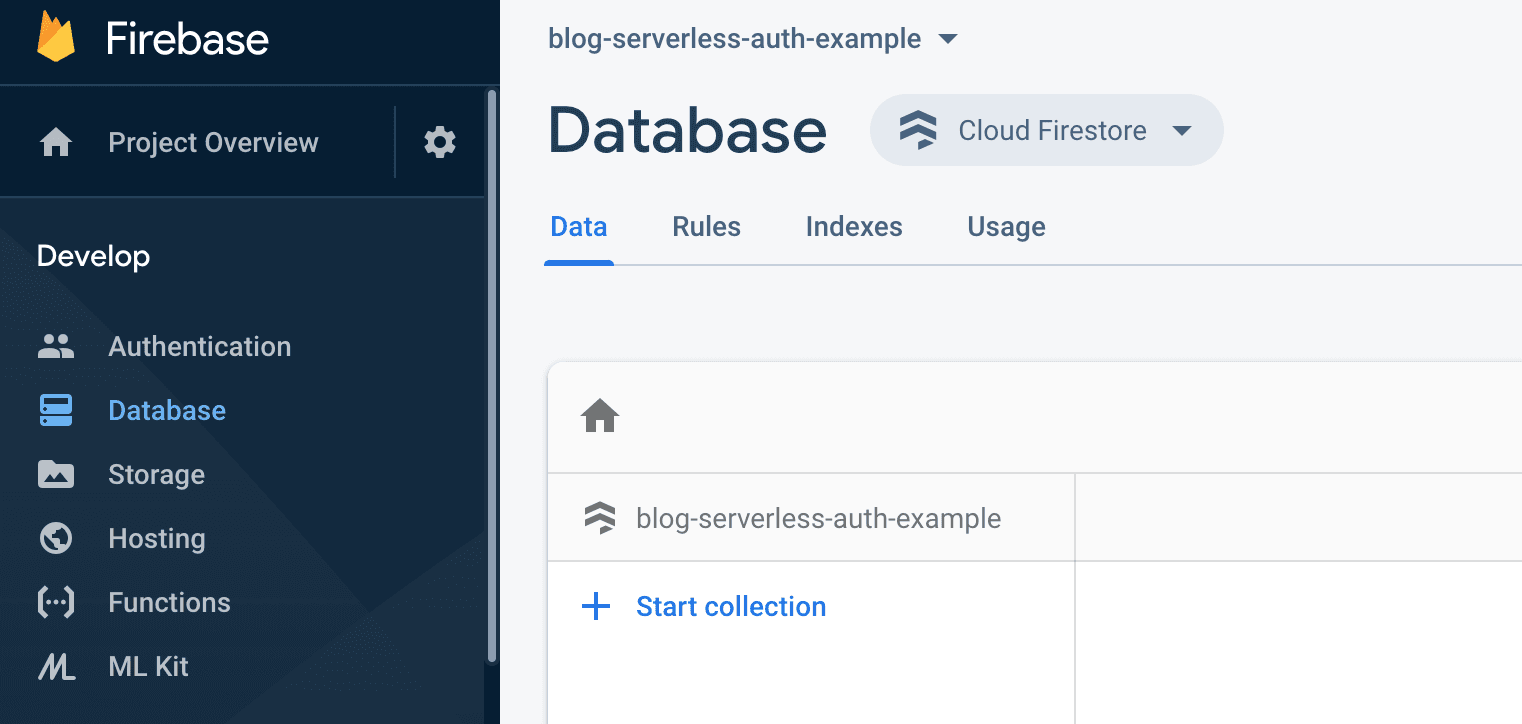
Now that we have a Firebase project defined, we can add a database to it. From the left sidebar choose "Database" and then "Create database".

Next step Firebase will ask you to define access rules. At the moment our project doesn’t support users or sign-in flows, so the fresh database needs to allow access from unauthenticated users. Select "Start in test mode" to opt into this behaviour:

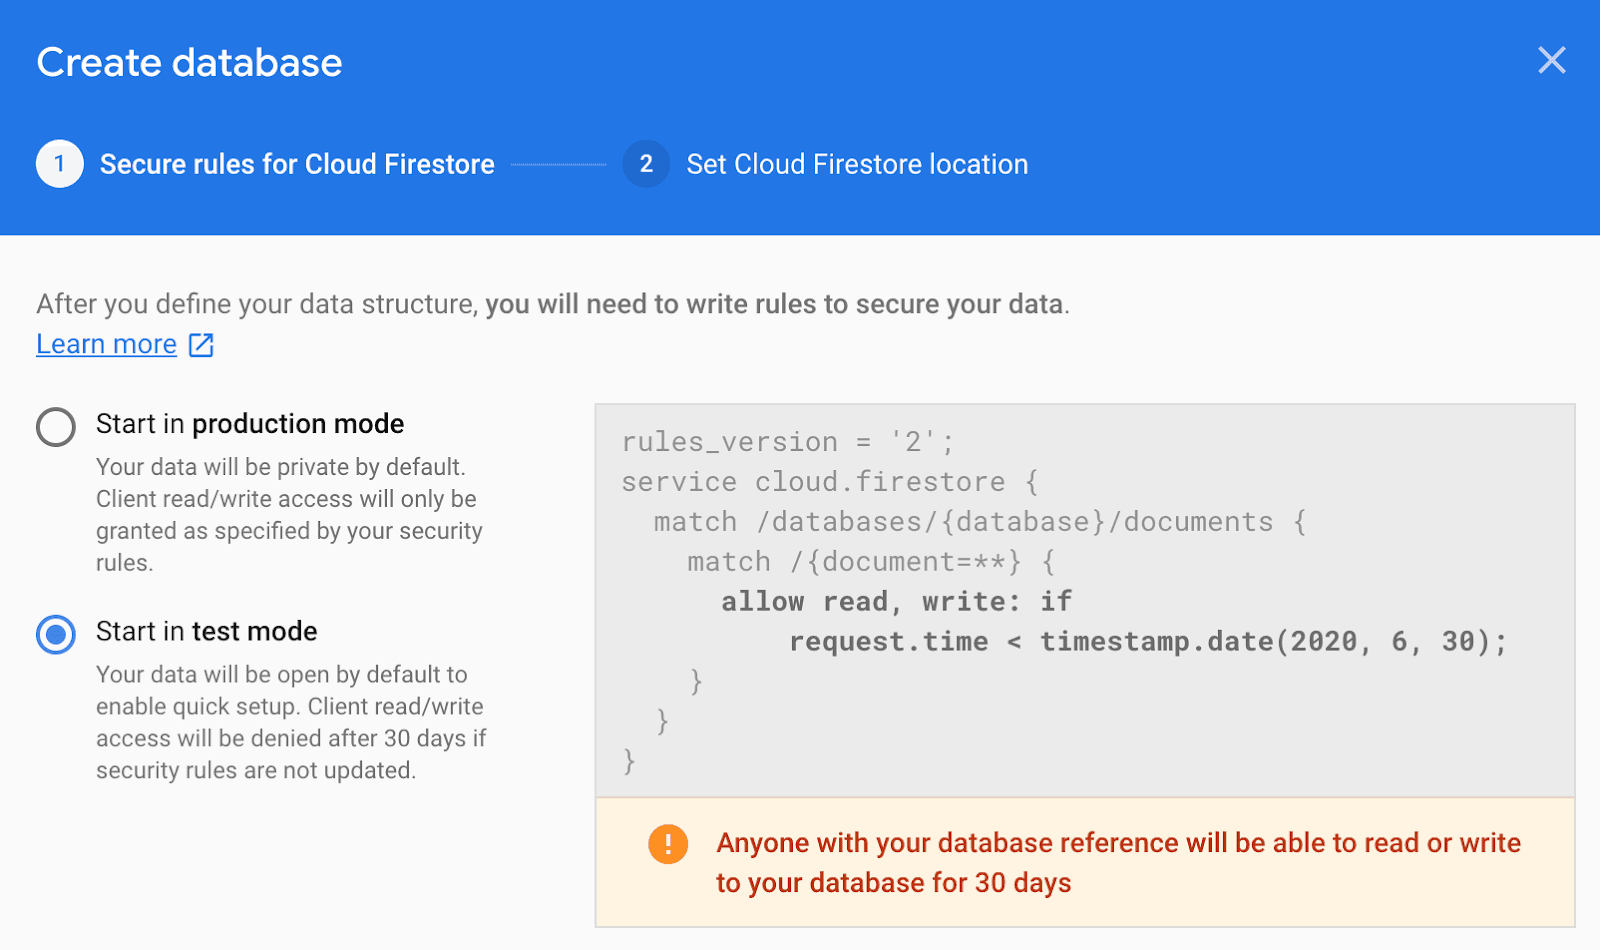
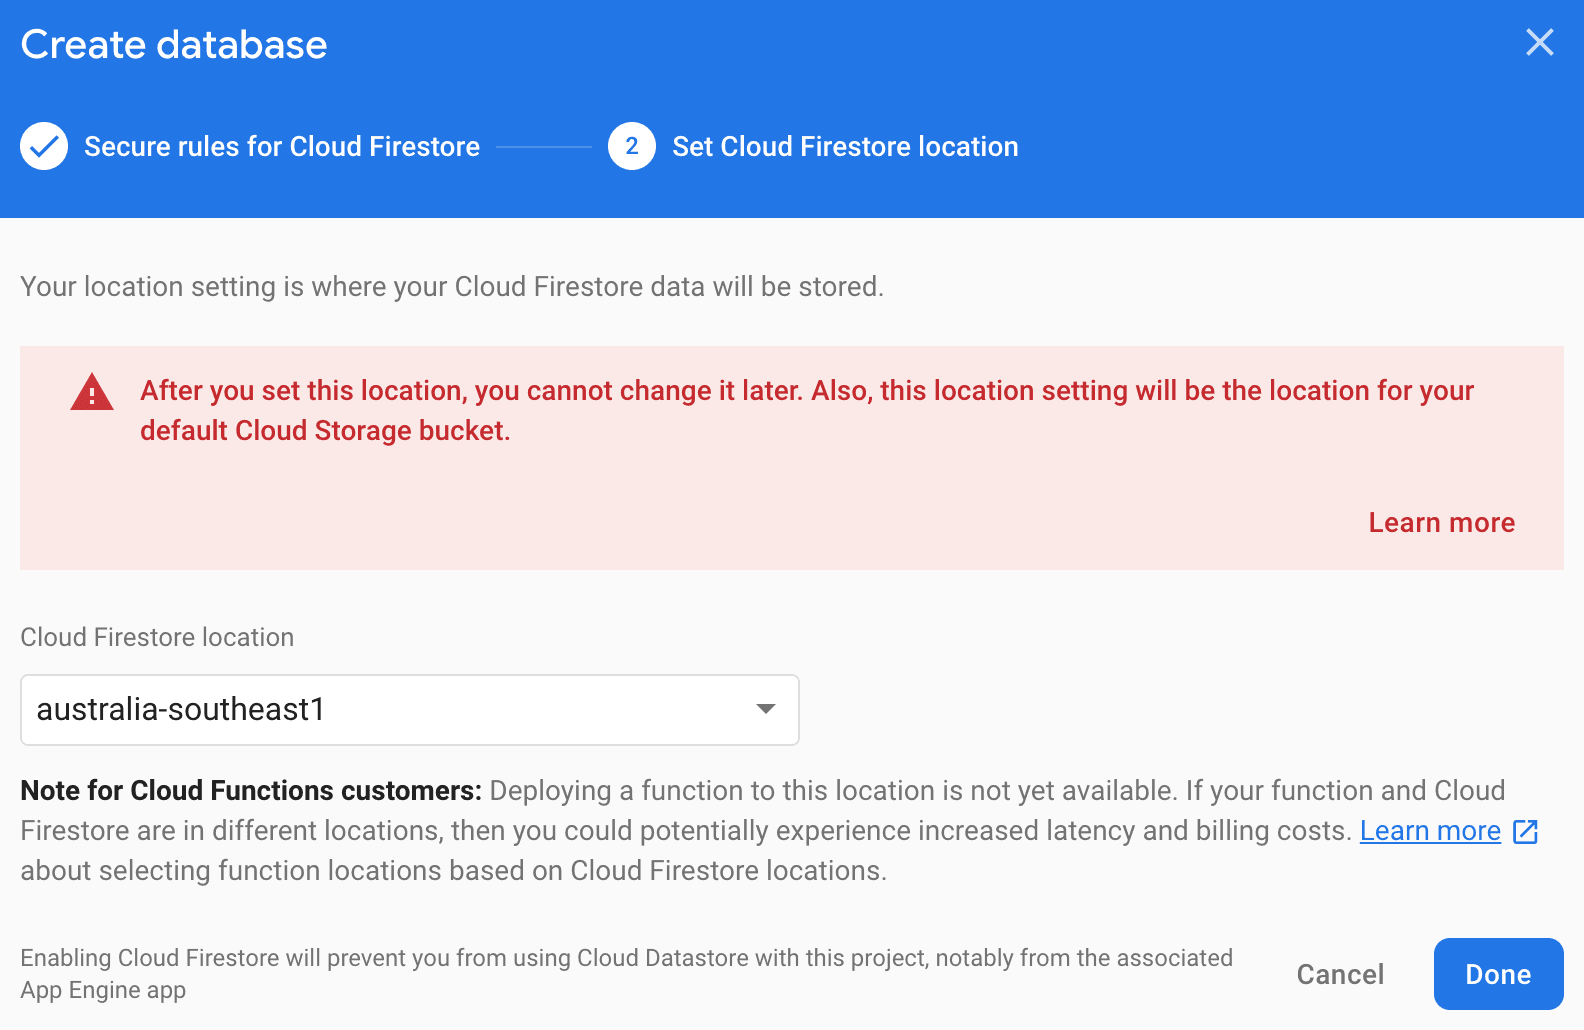
Next step is to select a region in the world to run the database service. For our test project, it doesn’t matter: I chose Australia because I live in New Zealand, but you can choose any other region. Click "Done" when ready.

Important Note: You have just created a database running with unrestricted access to the public. If you have reached this step you’ll probably want to continue until the end of this guide, where I’m going to show how to secure the database.
Great! So you have a database ready now. Let’s create a "Collection" to manage our shopping list. Click "Start collection":

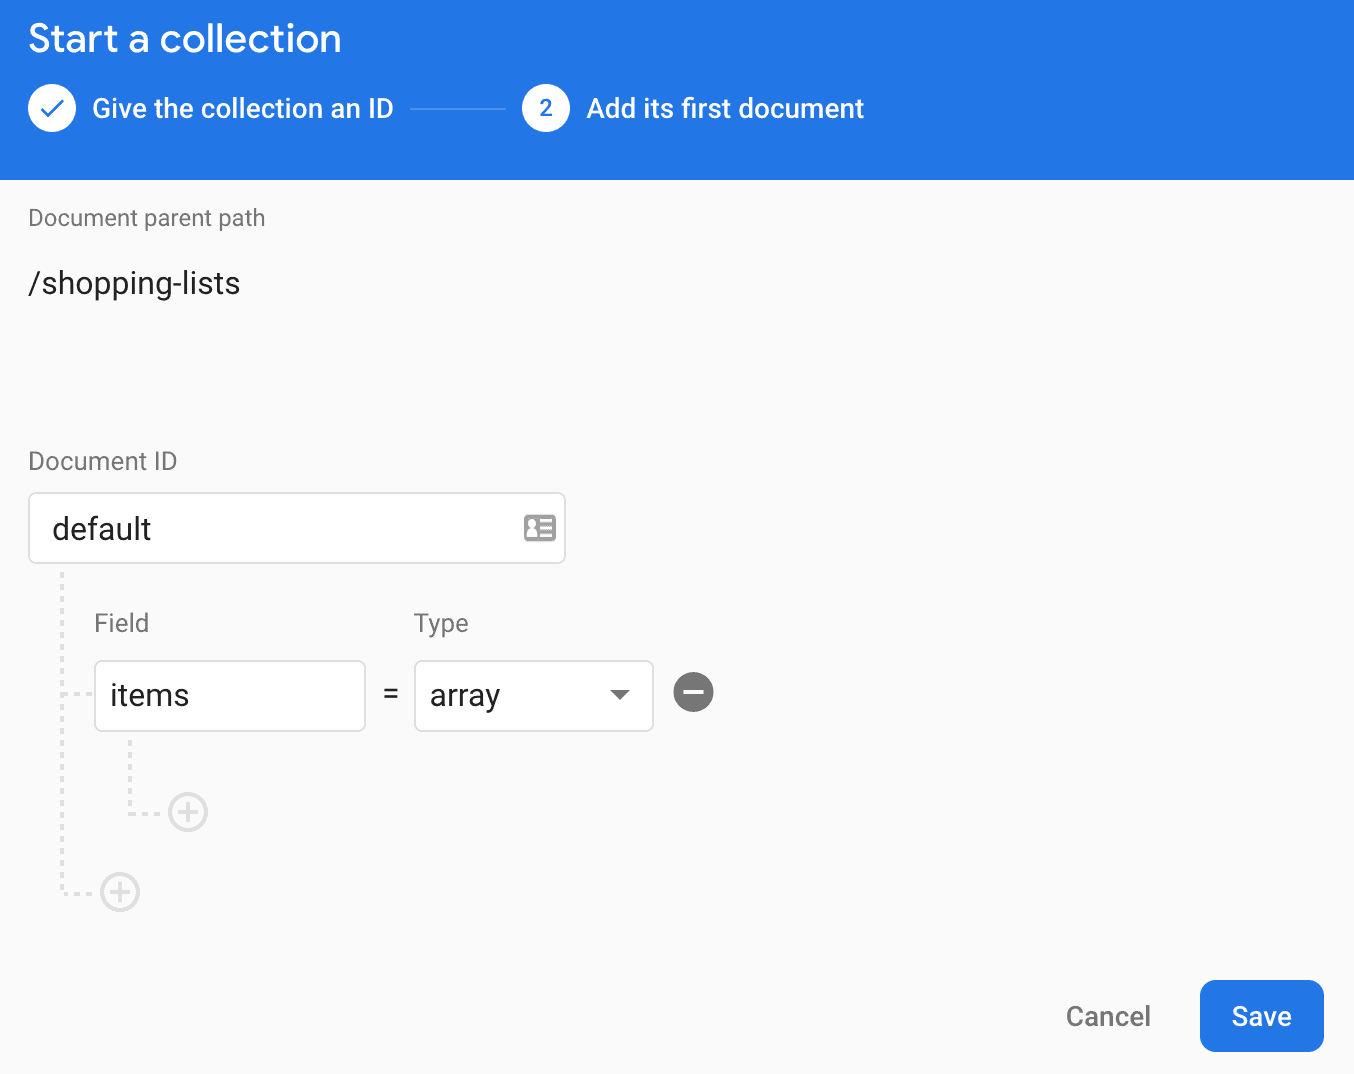
And then type shopping-lists as our initial collection.


This is just a demo project, so we’re going to have only one collection and one document to represent our shopping list. We’ll name our only document as default, and add items field with the type of array. Setup the collection so it looks like here, and click "Save" when done.

If everything went alright, your database should look like this now:

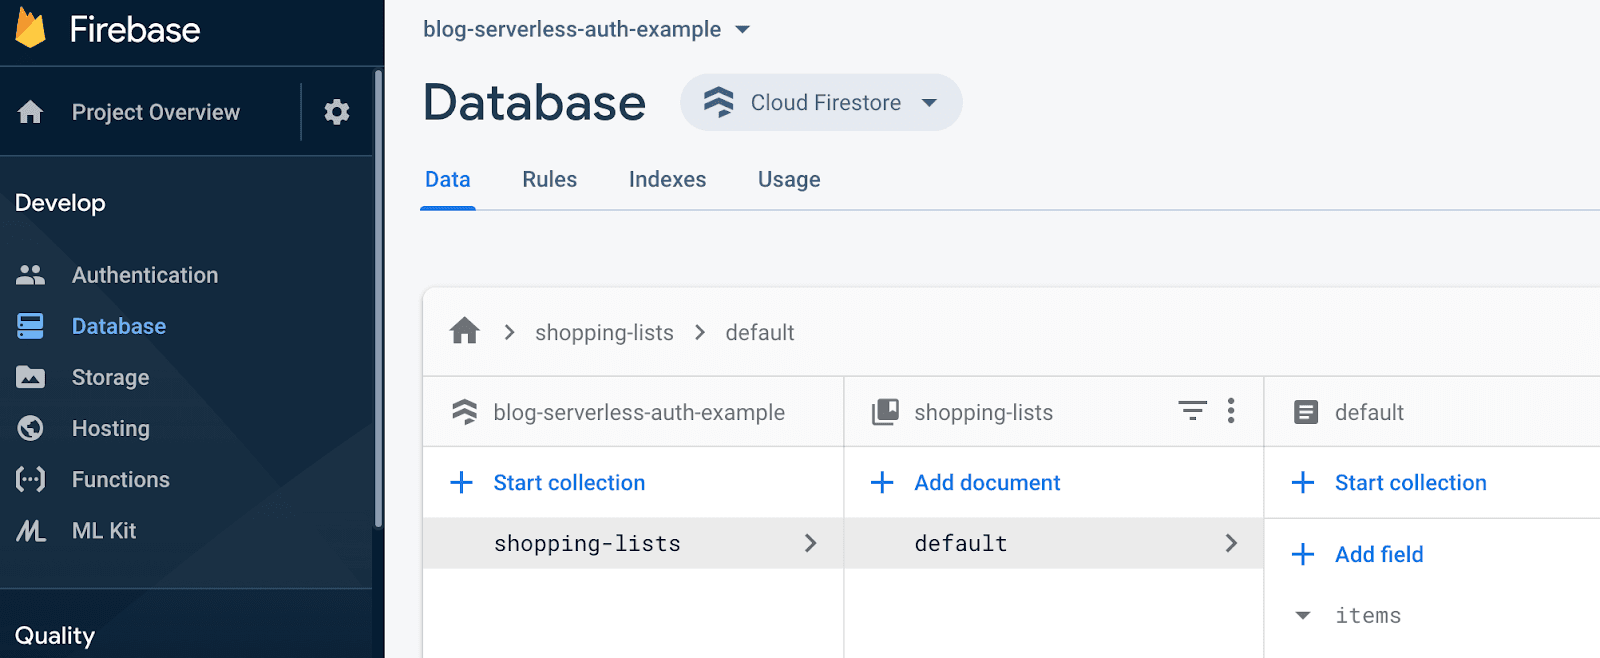
Awesome! Our database is ready and populated with an empty shopping list called default. Let’s connect the database to our application. We'll use the Firebase SDK, so let’s add it to our project:
$ yarn add firebaseNow let’s write some code. We’ll start by wrapping Firebase client SDK with our module. Add ./src/shared/firebase_app.js:
import firebase from "firebase/app";
if (typeof window !== "undefined") {  firebase.initializeApp({    projectId: "blog-serverless-auth-example",  });}
export default firebase;
Notes:
- We’re not giving Firebase any key or secret - just the project ID which you have chosen when you created the Firebase project. We’ll come back to this when we’ll add authentication.
- Firebase get initialized only on the client-side (
window !== "undefined"). Without the condition, the initialization code will also run on the local development server. That’s not a bad thing by itself, but because of how Next.js implements hot-reloadinginitializeAppmight rerun on the server. Firebase does not allow multiple invocations ofinitializeAppand if that happens you'll see this exception on the console:Firebase: Firebase App named '[DEFAULT]' already exists.
Now let’s add some functions to load and save a shopping list from the database. Add ./src/shared/database.js:
import firebase from "./firebase_app";import "firebase/firestore";
async function loadShoppingList(listName) {  const collection = firebase.firestore().collection("shopping-lists");  const shoppingList = await collection.doc(listName).get();  const data = shoppingList.data();  return data ? data.items : [];}
async function saveShoppingList(listName, items) {  const collection = firebase.firestore().collection("shopping-lists");  return collection.doc(listName).set({ items: items || [] });}
export { loadShoppingList, saveShoppingList };
Update the ShoppingList component to use the database:
import React, { useCallback, useEffect, useRef, useState } from "react";import { loadShoppingList, saveShoppingList } from "../shared/database";
let nextId = 0;
function ShoppingList({ listName }) {  const [list, setList] = useState([]);  const inputElement = useRef(null);
  // adds the value in inputElement to the list and update the database  const addItem = useCallback(() => {    if (inputElement.current && inputElement.current.value) {      const newList = [...list, inputElement.current.value];      saveShoppingList(listName, newList).then(() => setList(newList));      inputElement.current.value = "";    }  }, [listName, list]);
  // removes the i'th item from the list and update the database  const deleteItem = (index) => {    const newList = list.filter((_, i) => i != index);    saveShoppingList(listName, newList).then(() => setList(newList));  };
  // load initial list from the database  useEffect(() => {    loadShoppingList(listName).then(setList);  }, [listName]);
  return <table>{/* No changes here... */}</table>;}
export default ShoppingList;
The component is now accepting the name of the database list as a parameter. Then we initialize the UI on the useEffect block, by calling our database load function. We save to the database after adding/deleting rows from the UI. Clearly, it’s not a production-level code, as we’re not dealing with errors, multiple clients and probably other problems, but for our demo, this is good enough.
Our last step is to update ./pages/index.jsx - we pass default as parameter to ShoppingList component: recall that our database contains only one shopping list with the name default.
import React from "react";import ShoppingList from "../components/ShoppingList";
function HomePage() {  return (    <div>      <h1>Your shopping list</h1>      <ShoppingList listName="default" />    </div>  );}
export default HomePage;
Try to redeploy your app now. Does it work?
Congratulations! You have created a web app, backed by a database, with no cost and no server code involved!
Authentication
We have one missing piece left to make our example complete. Our database has only one shopping list, and all users are accessing and potentially changing the same list. There is also no privacy: anyone with Internet access can connect Firebase and change the data directly. Wouldn’t it be cool to have a separate list for each user, and to not allow users to browse each other lists?
That’s exactly what we’re going to do. We’re not going to build a user management system now. Similarly to database-as-a-service, there are external services that manage user identities, authentication and authorization. Actually, in the age of GDPR, managing these operations with 3rd party tools is safer: we don’t need to deal with private and sensitive data ourselves, and hence less exposed to security breaches or tight regulations.
The first thing to do is to enable authentication for the Firebase project. Open Firebase console, Then "Authentication" on the left and then choose "Sign-in method" tab.

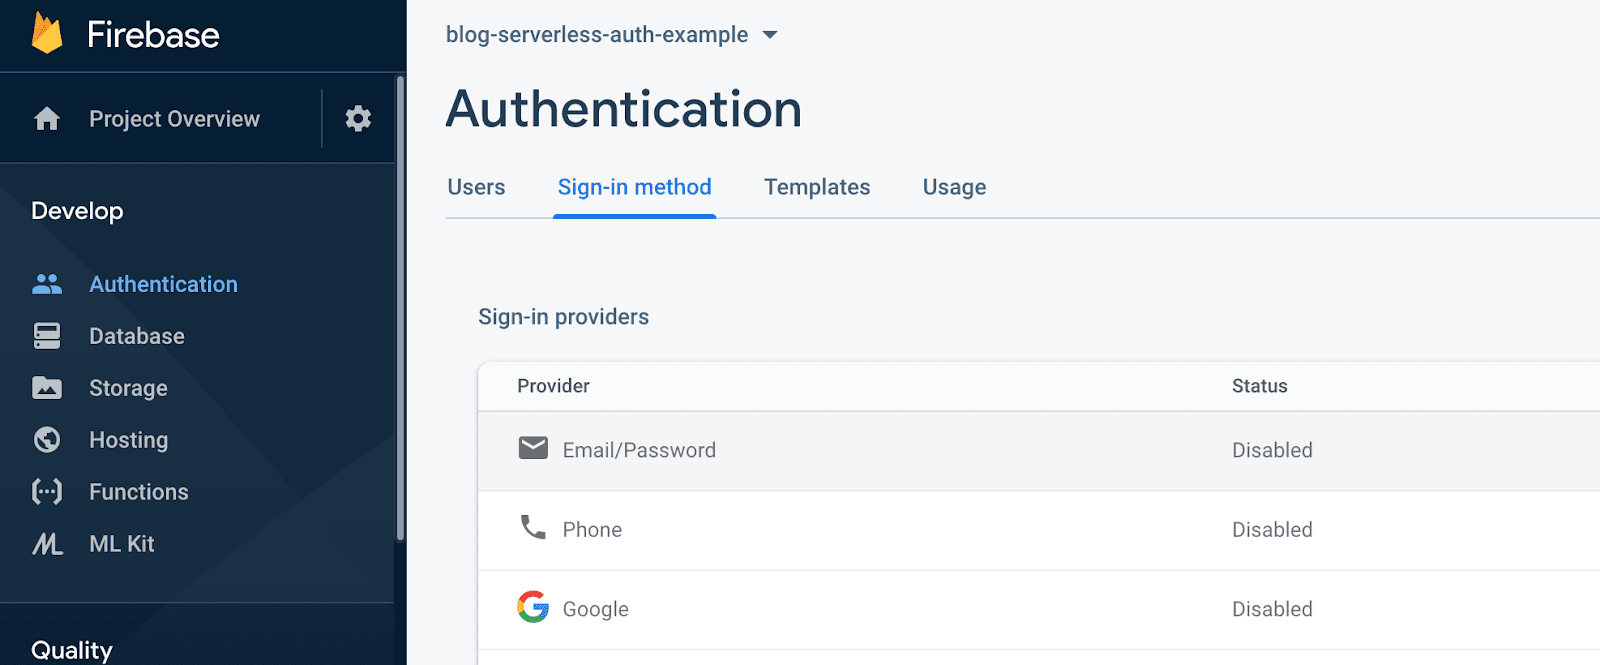
Firebase allows many different ways to sign in. The traditional method is "Email/Password": users would have to provide their email address and a password, and then Firebase will store their credentials in a secured way. Firebase will also manage the flow end-to-end: for example, it will validate the email address or handle password resets out of the box.
However, choosing a password might be annoying and harm user acquisition. It would be much easier if users could use their own Google account, for instance, to sign-in the application. We can safely assume that any person that trials our app also owns a Google account.
Firebase allows exactly that. The way it’s working is based on a standard protocol called OpenID Connect, a layer on top of the OAuth2 protocol, and the details are out of scope for this article. But the technique can be applied to any other "Identity Provider" that supports the OpenID Connect protocol, and indeed Firebase allows sign-ups from many other social networks. In a nutshell, what happens is when a user wants to sign-in with Google, you need to redirect them to a page managed by Google, and then Google themselves will authenticate the user. If successful, Google will (eventually) redirect the browser back to your website with an identity token (JWT). This token is then used by the browser to get authenticated against Firebase. Since the token is created and signed by Google, and Firebase is configured to trust Google tokens, traffic that comes directly from our website is honoured.
Let’s try it out. Enable the "Google" provider. You will be asked to provide some details about your new website.

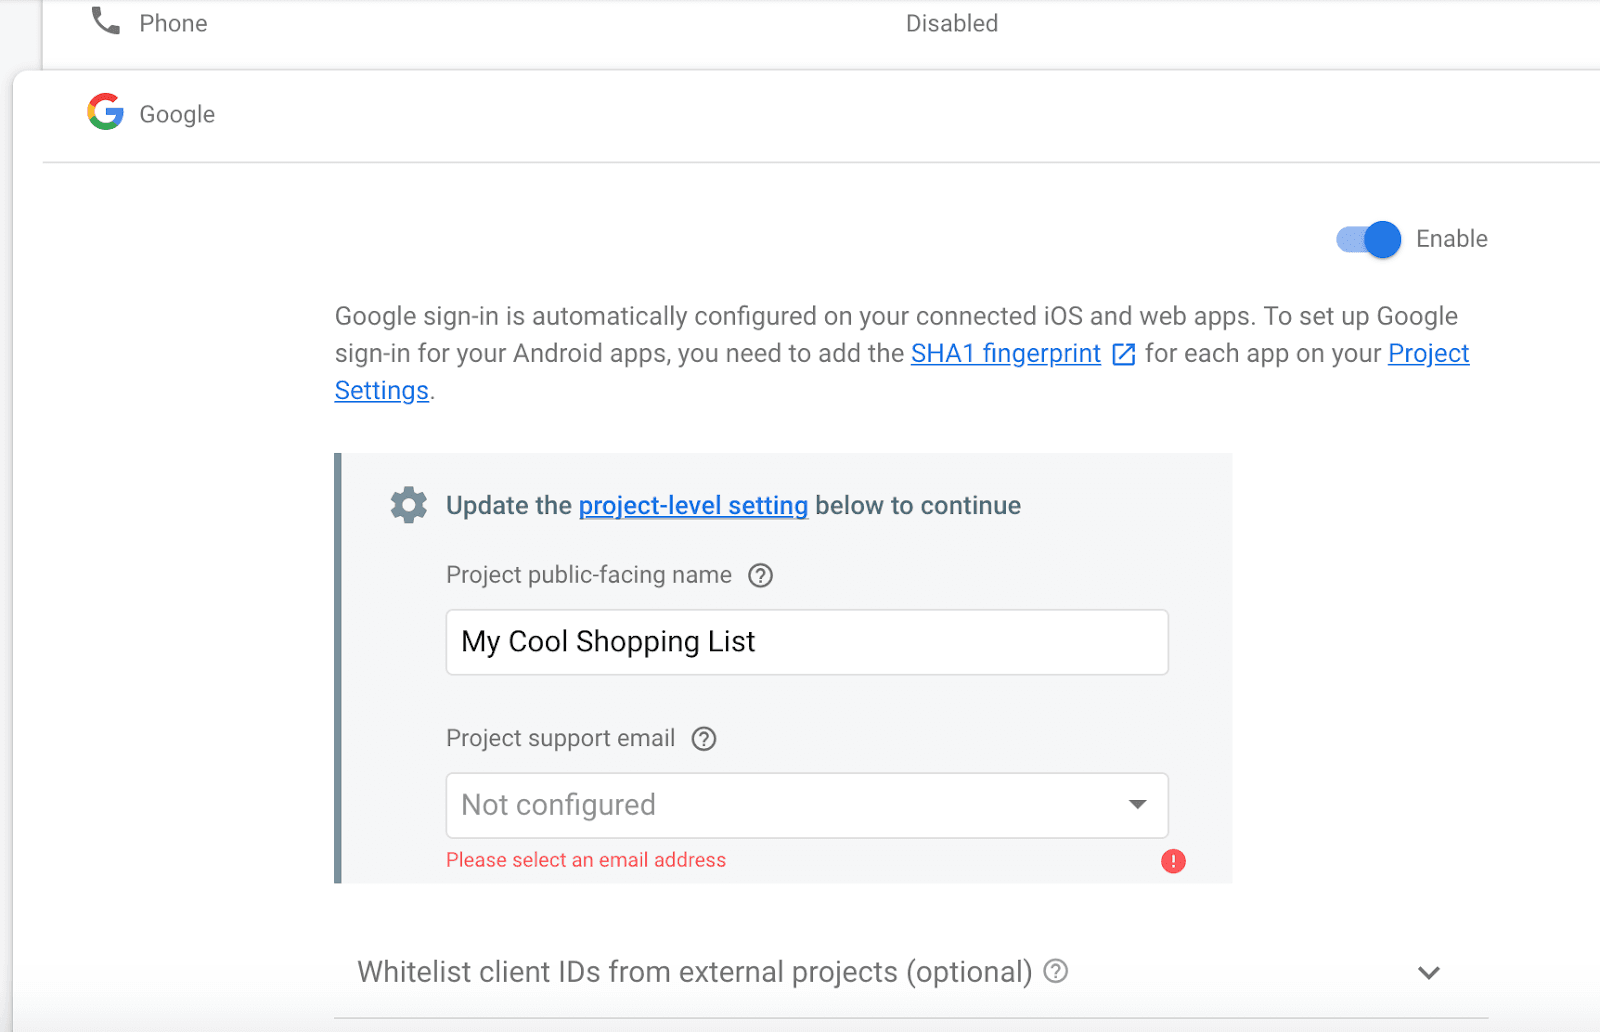
If you haven’t done so already, choose a "public-facing name" for your project and an email address. Both might be presented to your website users under different circumstances. Click "Save" when done.
Cool. Now let’s build an authentication component in our application. The component will simply render a "sign-in" button if the user hasn’t already signed-in; or render the children component if they did.
First we’ll add a generic hook to manage the sign-in using Firebase SDK. Add the following to ./shared/firebase_auth.js:
import firebase from "./firebase_app";import "firebase/auth";import { useEffect, useState } from "react";
function useAuth() {  const [isLoading, setIsLoading] = useState(true);  const [user, setUser] = useState(null);
  useEffect(() => {    const unsubscribe = firebase.auth().onAuthStateChanged((user) => {      setIsLoading(false);      setUser(user);    });    return () => {      unsubscribe();    };  }, []);
  return { isLoading, user };}
async function signIn() {  const provider = new firebase.auth.GoogleAuthProvider();  return firebase.auth().signInWithRedirect(provider);}
async function signOut() {  return firebase.auth().signOut();}
export { useAuth, signIn, signOut };
The useAuth hook manages a state that consists of the currently signed-in user, and Firebase SDK initialisation status. It registers a listener to catch user change events from the Firebase SDK, as described in the general docs. We also define two separate methods to sign-in and sign-out from Google. Have another read in the docs here for further details.
The standard caveat for this demo applies: Using React hooks with asynchronous functions is tricky. If onAuthStateChanged get triggered for an unmount component, a warning will show up in the console. Also, this code doesn’t handle sign-in errors: You’ll need to call getRedirectResult on page load to get sign-in error details.
We need to update the Firebase configuration at ./shared/firebase_app.js to allow our website to authenticate with Google.
import firebase from "firebase/app";
if (typeof window !== "undefined") {  firebase.initializeApp({    projectId: "blog-serverless-auth-example",    apiKey: process.env.NEXT_PUBLIC_FIREBASE_API_KEY,    authDomain: "blog-serverless-auth-example.firebaseapp.com",  });}
export default firebase;
authDomain is simply a combination of your project-id and firebaseapp.com.
Also add a file called ./.env.local with the actual apiKey value:
NEXT_PUBLIC_FIREBASE_API_KEY=<your-api-key>Your key can be retrieved from "Project settings" page at Firebase console. Be careful to not commit this file (and the key) to a remote repository: here we are using next.js capabilities to inject the key on build time. Note, however, that the key would be eventually available to the clients and it's not a secret. It allows our application to do operations on your Google Cloud account, which could lead to unexpected charges on your account. Therefore, we need to restrict the key’s functionality to reduce the security risk. This is explained at the end of this guide.
Now let’s create a new component, called PersonalShoppingList, that will display a shopping list based on the current signed-in user. If no user is signed-in, it will display a sign-in button. Add ./components/PersonalShoppingList.jsx:
import React from "react";import { useAuth, signIn, signOut } from "../shared/firebase_auth";import ShoppingList from "./ShoppingList";
function PersonalShoppingList() {  const { isLoading, user } = useAuth();
  if (isLoading) {    return "Loading...";  } else if (user == null) {    return <button onClick={signIn}>Sign In With Google</button>;  } else {    return (      <div>        <h3>User: {user.displayName}</h3>        <ShoppingList listName={`user-${user.uid}`} />        <button onClick={signOut}>Sign Out</button>      </div>    );  }}
export default PersonalShoppingList;
As you can see from the code, the shopping list name is based on the current user id, so each user will have a personal list on the database.
Last step is to use this new component. Update ./pages/index.jsx:
import React from "react";import PersonalShoppingList from "../components/PersonalShoppingList";
function HomePage() {  return (    <div>      <h1>Your shopping list</h1>      <PersonalShoppingList />    </div>  );}
export default HomePage;
Great! Everything should work now, at least from a local environment. Run again the application. Try to sign-in with different user accounts. Can you see how each list is stored separately for each user? Have a look in the Firebase console too, and watch how the data looks from the database perspective.
Build and deploy the application, and then try to sign-in from the deployed instance. It won't work, because we need to tell Firebase that Netlify is a trusted domain to handle OAuth redirects. Redirects are part of the authentication process. Firebase is explaining that in the browser console:


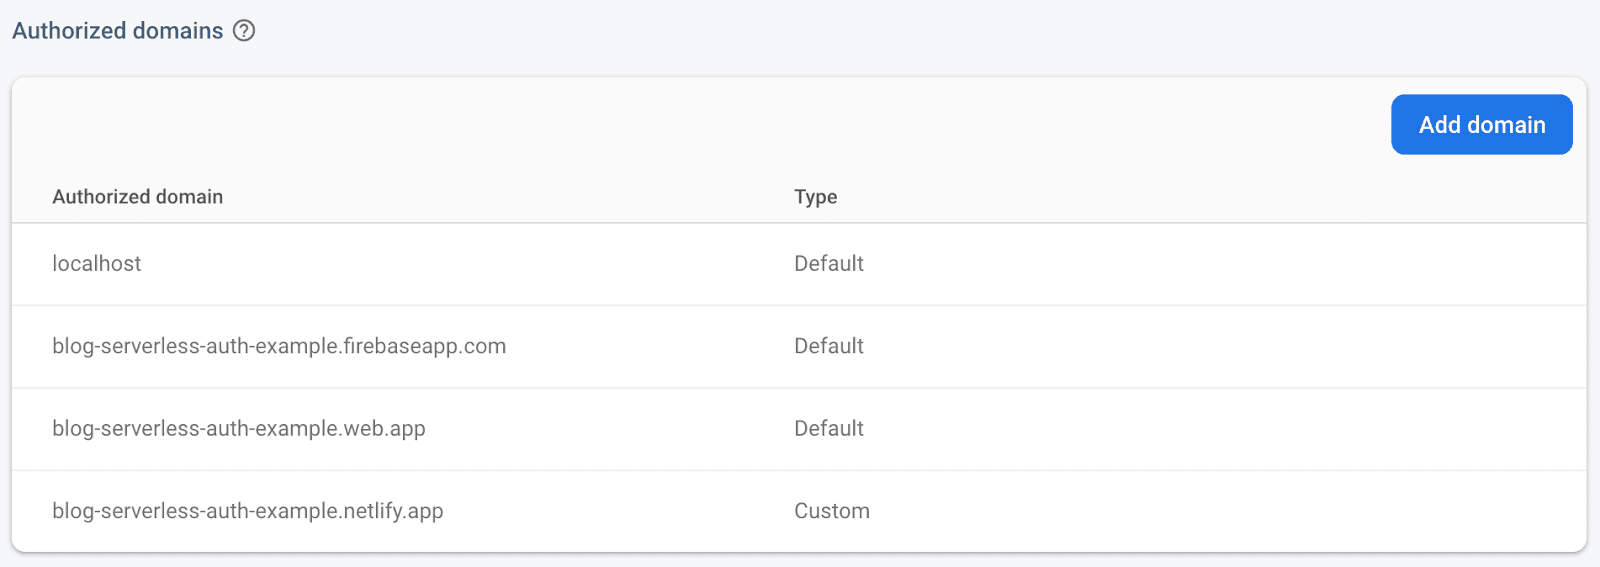
So open the Firebase console, Auth section, the Sign-in method tab, and at the Authorized domains section add <your-project-id\>.netlify.app domain.
After the change the section should look similar to this (you'll have project id instead of blog-serverless-auth-example):

You have probably noticed that each user’s shopping list is written to a separate location in Firebase. This is done in the PersonalShoppingList component:
<ShoppingList listName={`user-${user.uid}`} />This approach allows us to separate data belonging to different users, but it is still not secured. An untrusted client can change this line to access any user data, simply by replacing the uid string with ids of other users.
To solve this problem we need to do two things. First, we need to pass the identity token, which is stored on the user’s browser after a successful login, to the Firebase database. Since we’re using the same SDK for both Firebase authentication and database services, it’s already happening out of the box. The next step is to set up a Firebase database to utilise the identity token that is sent with every data request and authorise it against the data that is being requested. Let’s see how to do it.
Open the Firebase console, choose Database from the sidebar and then click on the Rules tab. In this screen, you can configure the access rules to all stored data. When we initially created the database we chose "test mode", which sat very open-access rules. Let’s look on them closely now:

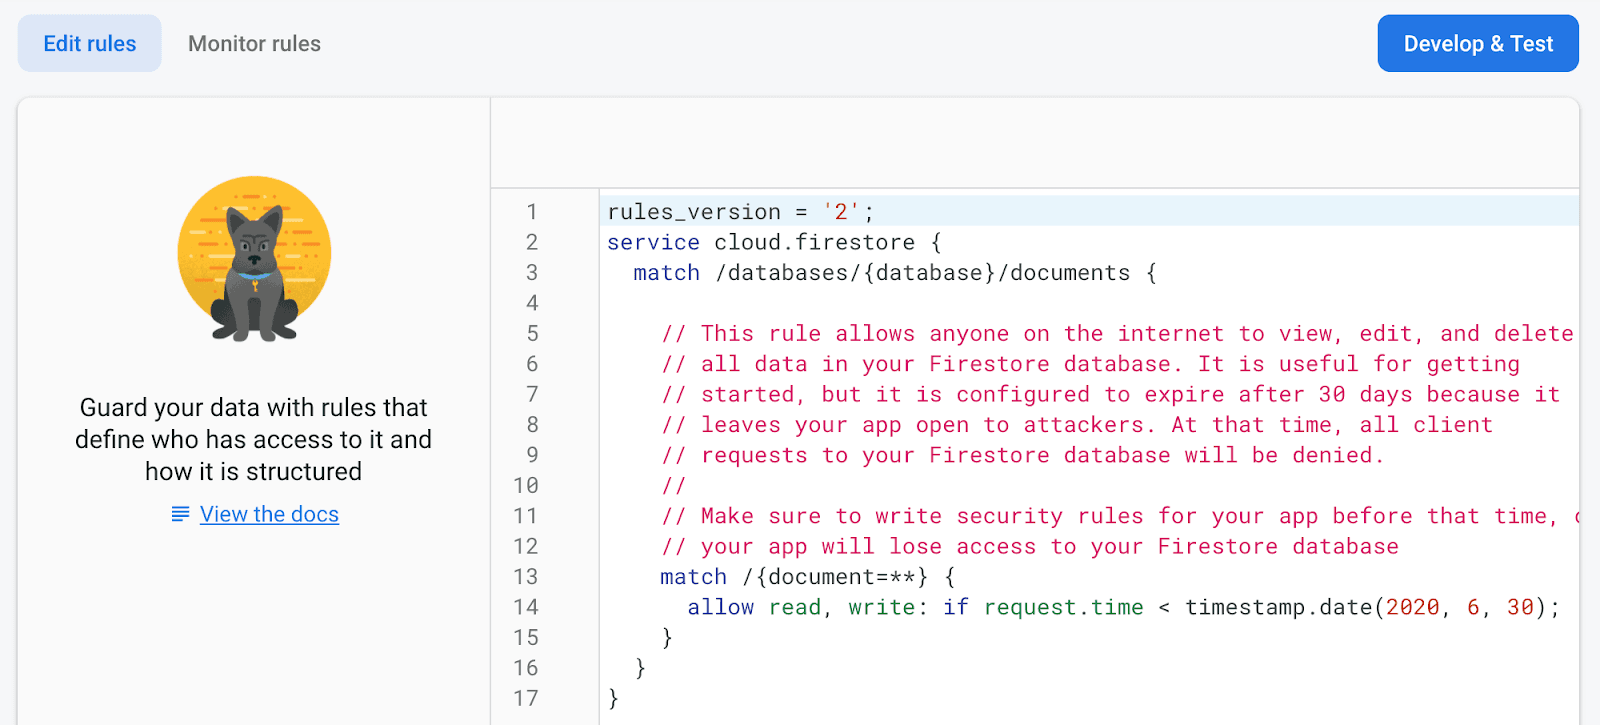
Briefly, this file says: For all collections in the system (line 3), and for every nested document inside (line 13), allow both read and write access as long we haven’t passed 30 June 2020.
We would like to change this rule, so access can be done at any time, but each user can access only their shopping list. Replace the content of the rules file with the following, and click "Publish".
rules_version = '2';service cloud.firestore { match /databases/{database}/documents { match /shopping-lists/{list} { allow read, write: if (request.auth != null) && (list == "user-"+request.auth.uid); } }}We are checking two things: The user is authenticated (request.auth is valid), and there is a match between the user id and the shopping list name. For more information on Firebase database rules and how to set them up, please refer to the docs.
Okay, time for testing! From the first impression, nothing should change. But try to create two different shopping lists with two different users. Then hardcode one user uid in the line
<ShoppingList listName={`user-${user.uid}`} />And then try to sign in with the other user. Does it still work? Can you still see the first user’s list? If everything works correctly, you should get a popup error message with "FirebaseError: Missing or insufficient permissions":

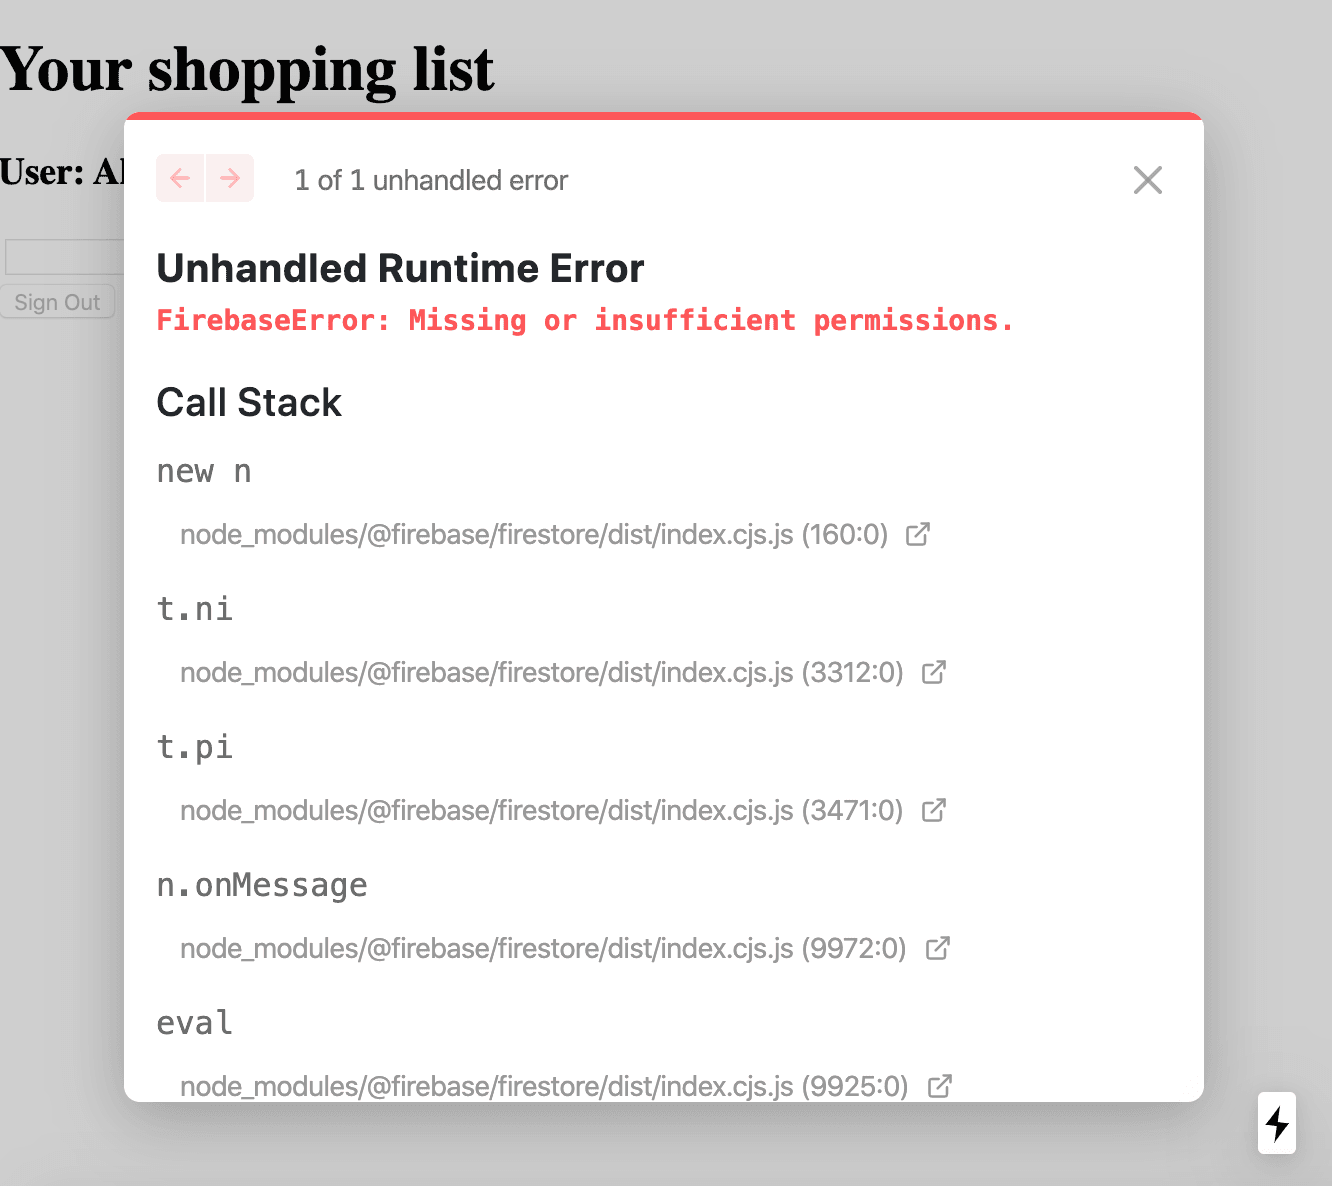
In production code, you would probably need to handle this exception more nicely, and test this behaviour with e2e testing framework. But for now, at least we know that our Firebase rules works!
Secure your API keys!
Serverless can be dangerous. By exposing an API key directly to the browser, anyone can use that key for accessing cloud resources on your behalf. Theoretically, one can use that key to bombard Firebase with requests, for example with a bot that generates huge shopping lists, and as result, you’ll end up with a huge bill by the end of the month. In a traditional server-based development this is not an issue, because overloading the server will simply make it crash. But in the serverless world there is no load limit, and no cost limit too! Hence it's a good practice to limit your budget on the account level. We'll touch this point again later.
Google provide some best practices around API keys, and how to secure them. Actually, one of their significant recommendations is to not use them - but that would defeat the purpose of this guide so we’ll ignore this recommendation. Yes - serverless development does pose some new risks!
What can we do then? As explained at Google's documentation we can restrict the key. We can make sure that only certain websites can use the key, and only for a very specific purpose. This will reduce security risk.
To restrict the key we need to login to the Google Cloud console (and not the Firebase Console which we used until now). Note that Firebase project is essentially an abstraction layer on top of Google Cloud services - every Firebase project has a Google Cloud project behind it.
From the navigation menu, choose APIs & Services and then Credentials from the sidebar. Your screen should show something like:

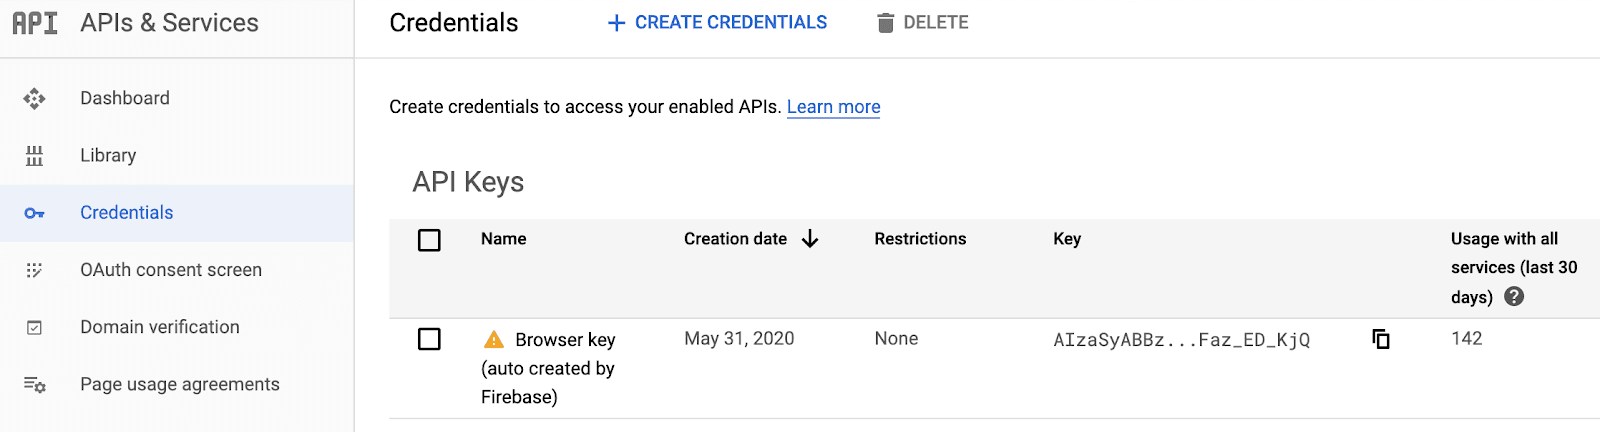
There you’ll find your Firebase API key, with a small icon providing a warning that the key is not restricted. Click on the key to edit it.
First, let’s add website restrictions. Choose "HTTP referrers" and then add three restrictions as demonstrated here (replace blog-serverless-auth-example with your project-id):

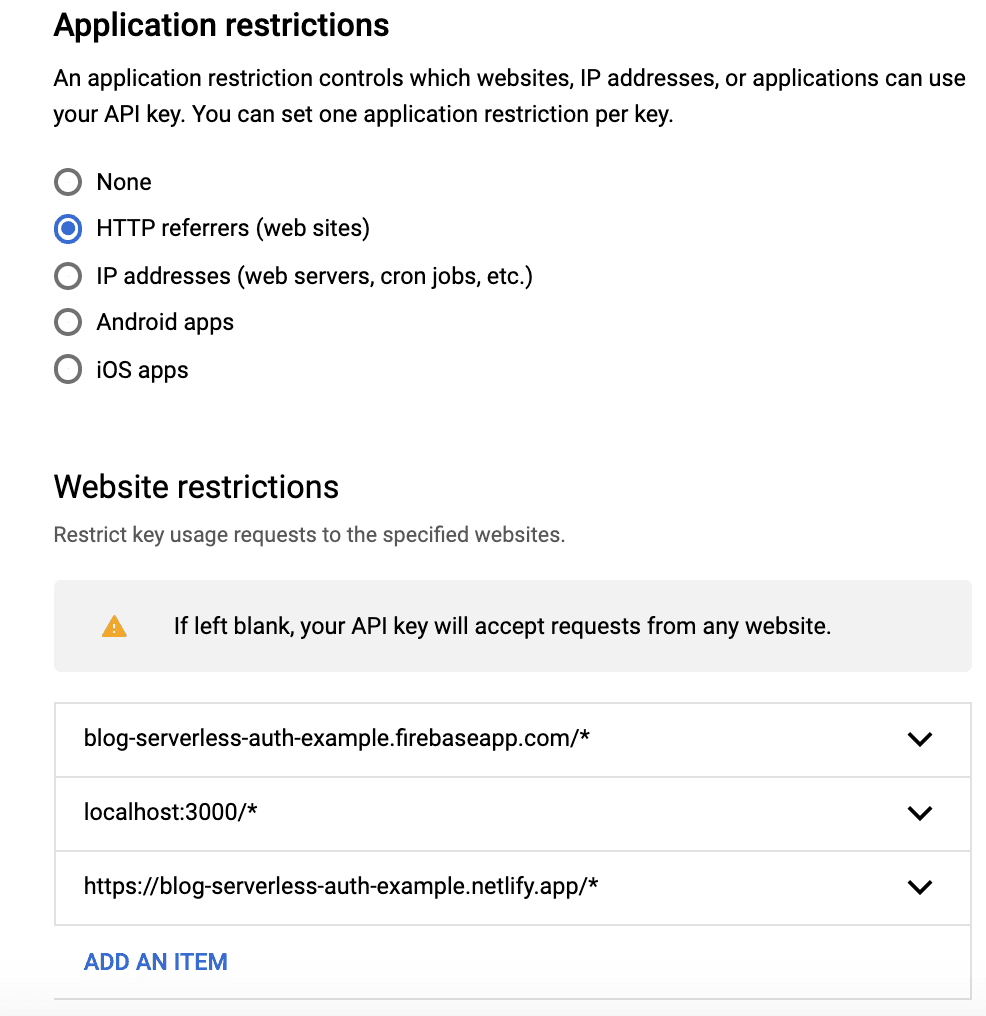
Shortly, we’re allowing using the key from Firebase auth domain (used during authentication and out of scope for this guide), the local environment, and our "production" domain which is hosted on Netlify. Note that HTTP referrers can be mocked, so this restriction alone doesn’t provide enough protection.
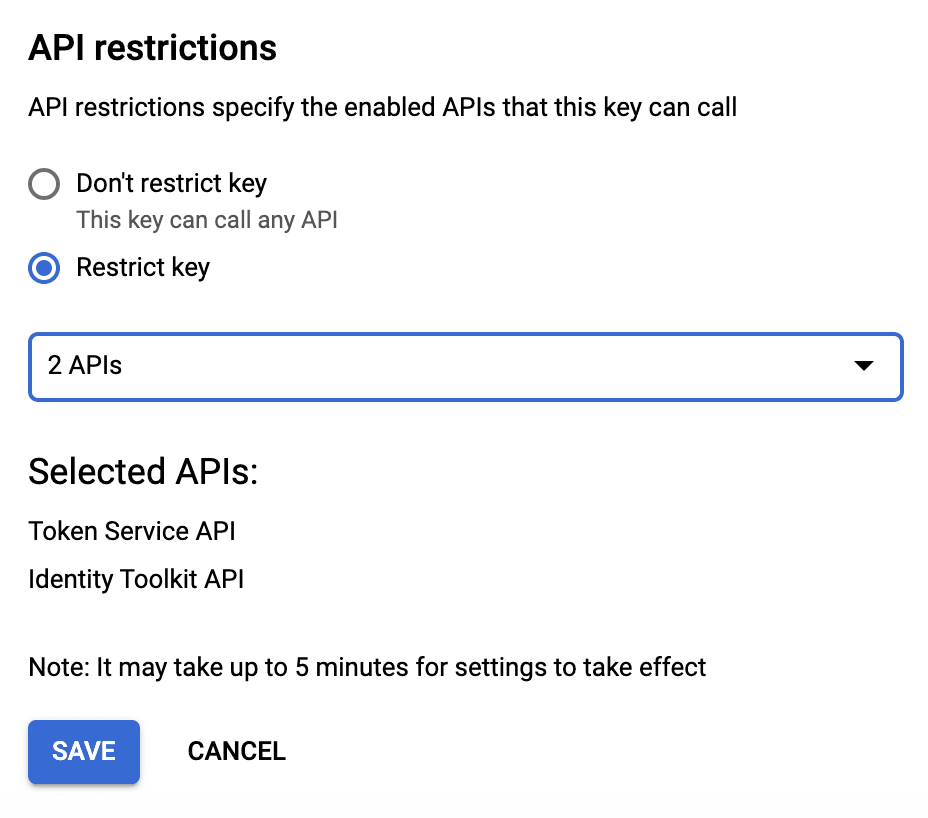
Next thing is to limit the scope of Google cloud APIs that can be accessed with our key. We’re using the key only to get the authenticated user from Google. Head to the "API restrictions" section, choose "Restrict key" and add "Identity Toolkit API" to the list. For our users to be able to stay signed-in for more than an hour, we would also need the "Token Service API" (behind the scene, the Firebase SDK will use the "Token Service API" to refresh the identity token acquired by the "Identity Toolkit API"). Once done, click Save.

That’s it! Your API key is now restricted to the minimal scope that still allows our website to function.
Tip: Always define a budget alert on your billing account. If your API key gets abused and suddenly your costs rise above some threshold, you’ll get notified immediately. More on this topic at Google documentation. For this guide, this advice is less relevant, because the project we created works on Google free tier, and it shouldn’t be linked to any billing account. You can verify that the project we created in this guide is not linked to a billing account at Google Cloud billing console. Still, having this alert set is a good habit.
Summary
Development in serverless style is challenging. It requires integration with multiple different tools and the learning curve might be steep. The Serverless ecosystem is still evolving, and the best practices are still get written. Costs rise quickly, and for heavy-load systems, the serverless architecture tends to be more expensive. Debugging is limited because of lack of access to the infrastructure. Security requires more knowledge to get implemented correctly.
But, Serverless is also fun! In this post, we have seen how to use several different services to build a completely new web application. There is no central server in our solution, and yet we were able to provide database and authentication layers. Our application is scalable from day one because we employ high-level services from cloud providers rather than low-level infrastructure. By leveraging the free-tiers of the vendors, we can ship a production-grade web-application with literally zero running costs. Isn't it cool?
Good luck!
Appendix: Troubleshooting
If you've picked a user from Google sign-in screen and got redirected to your website, but then you get constant "Loading…" message, then probably some error has occurred. As previously mentioned you can call getRedirectResult to extract error details and present it nicely to the user. Meanwhile, you can just check the console.
One of the possible error messages you might see is "This browser is not supported or 3rd party cookies and data may be disabled.":


It’s probably because 3rd party cookies are disabled in your browser. Unfortunately, sign-in with Firebase SDK requires to enable 3rd party cookies for Firebase authentication domain (source). The workaround is either to alias a dedicated subdomain to Firebase authentication domain (explanation) or to use an alternative client SDK (for example Google offers alternative sign-in API). I've followed the former workaround to make the live demo work on my gamliela.com domain, with a bit of help from Stack Overflow.